Viewing Subdivision Plans
in Google Earth
(Printer-friendly version)
Once Google Earth is installed, follow these steps to view the historic Subdivision Plans in Google Earth.
1. After reading all of these instructions, click on the relevant link for the Subdivision Plans:
>>
Link(s) to Subdivision Plans are found HERE <<
(These are active in the non-print-friendly page)
2. A Dialog Box should open, asking you to save the Google Earth file, which should have the file extension ".kmz". Choose where you are going to save the file, then click SAVE.
3. Wait for the ".kmz" file to finish downloading, then locate it and open it by double-clicking it. Google Earth will open and display the Subdivision Plans in their respective locations in its 3D viewer. (You can also open Google Earth separately, then open the downloaded file by choosing "Open" from Google Earth's "File" menu).
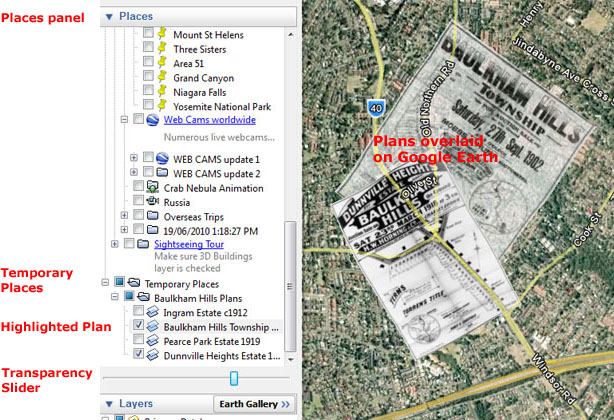
4. In Google Earth, the links to the Subdivision Plans are found listed in the left-most panel, under Temporary Places, found at the bottom of the Places panel (you may need to scroll down to see them) - see screenshot, below.
Ticking
the small box beside each Plan name makes that Plan visible in the
3D viewer.
Unticking the small box hides that Plan.
Single-clicking on a Plan's name will highlight it.
Double-clicking on a Plan's name will move that Plan into view
in the 3D viewer.
5. At the very bottom of the Places panel is a Transparency Slider. It controls the transparency of whichever Plan is highlighted in the list. (Make sure the Plan's name is highlighted, its "visibility" box is ticked, and that the highlighted Plan is in view in the 3D viewer).
6. Note that the Subdivision Plans are "draped" over the countryside in Google Earth. Use the usual Google Earth controls to zoom, rotate, and tilt your view so you can see how the Plans follow the contours of the ground.
|